SignCloud Advanced Conditions
SignCloud Advanced conditions allow you to control when an item is displayed using JavaScript-like expressions.
Data defined in the active screen, stack item, slot, or sequence can be used in expressions. This data can be populated by sensors such as GPS, player extensions, manually set in data fields, or automatically updated by 3rd party services.
The stack item will only display if the expression evaluates to true.
Remember to test conditions in the admin interface. Press the a=b button on the sequence tab or playback simulator to set the value of variables.
Basic Syntax
There are a variety of predefined variables and helper functions to enable powerful logic to be defined.
| Syntax | Description |
|---|---|
== | Test for equality. For example temp == 23 will only return true when the data named temp is set to 23. |
!= | Test for inequality. For example temp != 23 will only return true when the data named temp is not set to 23. |
> | Test if one value is greater than another. For example temp > 23 will only return true when the data named temp is greater than 23. |
< | Test if one value is less than another. For example temp < 23 will only return true when the data named temp is less than 23. |
>=, <= | Syntax for greater than or equal to and less than or equal to. |
&& | Ensures two expressions are true. For example temp < 23 && screenSize > 40 only returns true when the data named temp is less than 23 and the data named screenSize is greater than 40. |
|| | Ensures either expression is true. For example temp < 23 || screenSize > 40 returns true when the data named temp is less than 23 or the data named screenSize is greater than 40. |
(, ) | Control grouping and order of evaluation. For example true || (true && false) returns true but (true || true) && false returns false. |
Date and Time Functions
The time zone used by default will be the time zone of the device.
| Syntax | Description |
|---|
time.after("2014-02-01") | true if time is after 1st Feb midnight. |
time.after("2014-02-01 12:00") | true if time is after 1st Feb 12pm. |
time.before("2014-02-15 13:00") | true if time is before 15th Feb 1pm. |
time.hour() == 13 | true if hour is 1pm. |
time.decimalHour() > 13.5 | true if time is after 1:30pm (decimal). |
time.after("13:30") | true if time is after 1:30pm (time). |
time.day() == "Thursday" | true if day is Thursday. |
time.weekday() | true if it is a weekday. |
time.weekend() | true if it is a weekend. |
time.month() == "August" | true if month is August. |
time.minute() == 5 | true at 5 minutes past every hour. |
time.second() == 59 | true at 59 seconds past every minute. |
time.date() == 1 | true if it is the 1st day of the month. |
time.between("14:05", "16:30") | true if time is between 2:05pm and 4:40pm. |
time.between("18:00", "07:00") | true if time is between 6pm and 7am of the following day. |
time.between("2014-01-01", "2014-01-31") | true if time is between 1st Jan 12am and 31st Jan 12am. |
time.between("2014-01-01 10:00", "2014-01-31 14:00") | true if time is between 1st Jan 10am and 31st Jan 2pm. |
time.between("19:00", "22:00", "Europe/London") | Use a custom timezone. – true if time is between 7pm and 10pm in London. (player 11.11+) |
time.millis() | Milliseconds since the UNIX epoch (January 1, 1970 00:00:00 UTC). |
| Note: The time zone used by default will be the time zone of the device. |
Geolocation Functions
| Syntax | Description |
|---|---|
| true if the location of the screen is less than 10 miles from the location with latitude of 51.48 and longitude of -0.10. |
| true if the location of the screen is less than 20 kilometers from the location with latitude of 51.48 and longitude of -0.10. |
| true if the location of the screen is inside the polygon defined by the list of latitude longitude pairs. Please note, this function is designed for short distances (max 100km) that do not cross the international dateline. android-player-17.1.apk+ or android-exoplayer-3.1.apk+ required. |
| Same as above but accepts a single argument quoted String representation of many latitude longitude pairs. In addition to improving performance this function allows other defined data to be used for example gpsInside(manhattanPolygon). |
These functions require gpsLatitide and gpsLongitude to be set in the data. Screens will update these values automatically.
For testing in the admin interface, set a test location using the set test data dialog. This is accessed by pressing the a=b button on the sequence tab or playback simulator.
More Functions and Values
| Syntax | Description |
| Generates a random number between 0 and 1. For example random() < 0.5 returns true 50% of the time. Note: Generates a new random number every time it appears in a condition. |
random | A random number between 0 and 1. A single number is generated and reused for evaluating all items in a stack. This is important for accurate division of probabilities between alternatives. #1 |
| loopCount | The number of loops of the main sequence since the player started. This makes it possible to only show an item every n loops. e.g. loopCount % 5 == 0 will only show the item every 5 loops of main sequence. |
| Returns true if the string contains the search. |
| Returns true if the string starts with the search. |
| Returns true if the string ends with the search. |
isDefined("name") | Returns true if the data with the given name is defined and can be used in condition evaluation. Remember to quote the name! #2 |
isNullOrEmpty("name") | Returns true if data with the given name is undefined, null or empty. Remember to quote the name! #2 |
#2 Only available in signagenode-2023-10-18 or later.
Simplify list processing using strings
A common requirement is to show an item in a shared sequence on a subset of screens.
One way to do this is by assigning data to screen and accessing in a condition.
Example: Screens include airportCode in the data assigned with a value e.g. ANC
Condition to display item at 4 airports:
airportCode == "ANC" || airportCode == "BTR" || airportCode == "BUF" || airportCode == "CAK"
To simplify conditions involving lists of data, the string search functions above can help.
stringContains("ANC,BTR,BUF,CAK", airportCode)
For long lists this is more convenient and efficient than using multiple boolean operators.
Strict evaluation
Condition evaluation requires all variables to be defined or the condition will throw an error and the item will be skipped. When some variables may not be defined consider using short circuit evaluation and the isDefined()and isNullOrEmpty() functions to avoid errors.
Example:
isNullOrEmpty("airportCode") || !stringContains("ATL", airportCode)This example will show the item on all screens except those with airportCode set to “ATL”.
Variable Scope and Order of Preference
Variables within the current evaluation scope can be accessed in conditions. The scope includes: current item data, current slot data, current sequence data, and screen data.
Screen data will override sequence data with the same name. This can be useful when setting defaults in the sequence data that will be overridden by specific screens to provide customisation.
The order of precedence is as follows: (Highest precedence used)
- Active item data
- Active slot data
- Active screen data
- Active sequence data (top to bottom when using base sequences)
Extended Scope
To evaluate outer sequence item conditions at the same time as an inner sequence item condition the scope must be extended.
This is used for schedule sequences, when a changing hour or day should break out of playing a long, looping inner sequence.
The following data in the outer sequence or outer sequence item extends the scope.
conditionScope=extend
It is also possible to access data from outer sequences if the outer sequence or outer sequence item includes the following:
dataScope=extend
Web page main sequence scope
When accessing data using the JavaScript DigitalSignage.getData(name) function the main sequence (which may differ to current sequence) is also in scope. This can be useful for HTML based sequence frames.
Smart Display Pacing
When an item contains a target number of plays, Smart Display Pacing either displays or skips the item in a given loop of the sequence. A probabilistic model is used. The logic is as follows:
- The servers maintain a play count for the item.
- Every 10 minutes an interim target (pacing) is calculated based on constant play rate to reach target in the defined period.
- If the play count is greater than the interim target, the probability of display is reduced to 75% of its current value.
- If the play count is less than the interim target, the probability of display is increased to 150% of its current value.
Smart display pacing appends the calculated required display probability to the item condition. For example, random() < 0.4 represents a 40% probability of displaying the item in a sequence loop.
Communications Overview
This article outlines the inner workings of the communication mechanisms used by stacks loaders and players. For a general overview of network ports used please see Device Communications.
Device to server communications
There are two layers of communications between devices and servers.
- Loader communications facilitate the management of devices including software updates.
- Player communications synchronises player data with a server and instructs a device what media should be downloaded and displayed.
Loader communications
Devices run a small application known as DS Loader, which downloads player software. This separation makes it easy to manage new devices and deploy new player software. The communication is primary UDP with HTTP fallback support as outlined below.
HTTP communications
When DS Loader first starts, HTTP is used. This is because UDP might be blocked.
- DS Loader makes an HTTP connection to a server as specified in DS Settings.
- DS Loader sends the MAC of the device and basic device info.
- Server responds with a command – such as player software to download and execute.
- DS Loader starts UDP communications.
UDP communications
- UDP packet sent to server containing MAC of device and basic device info.
- UDP packet returned to device containing a command.
- Wait loaderCommsPeriod and repeat.
If no UDP response is returned from the server within the regular communications period, DS Loader falls back to HTTP communications.
Instant communications
After the first UDP packet has been sent to the server, the server can send commands at any point in time. This allows instant communications without maintaining a open connection that would be required for TCP/IP.
If UDP communications fail, the only opportunity for the server to communicate with the device is during the brief HTTP communications window that occurs approximately once per minute instigated by DS Loader (polling).
Example DS Loader commands
- Download and execute player software
- Instruct currently executing player to synchronise data
- Upload the currently available logs
- Upload a screenshot
- Restart DS Loader app
- Reboot the device (root needed)
- Clear all the data (including cached player software) on the device
- Upgrade DS Loader (root needed)
Security
DS Loader communications is not encrypted with TLS as this would require a battery backed clock and management of unique private keys for each device. Instead, communications is digitally signed by a private key on the server that is verified using a public key stored in the loader. Unsigned or incorrectly signed UDP or HTTP communications is ignored. This means DS Loader is not vulnerable to Man In The Middle Attacks.
Player communications
DS Loader commands the executing player to perform player communications. This command includes a URL where the player should post data. This address is typically HTTP, but HTTPS is also supported. In response to posting the data, the server will return a HTTP redirect to a location where the player can fetch the latest sequence meta data.
In typical operation, player communications occurs once per minute. However, when DS Loader UDP communications is working correctly, the server can instruct the player to synchronise data at any point in time. Likewise, the player is able to communicate with the server at any time.
All player communications from the server are digitally signed and verified.
Blobstore communications
Media uploaded to the stacks platform is processed, named, and stored in storage buckets, such as Amazon S3 and Google Cloud Storage, then distributed in a variety of ways.
We refer to media (and other data types) as BLOBs. They are stored in Blobstores.
Content Delivery Network (CDN)
Caches at multiple edge locations serve BLOBs from the primary Blobstores. Players are provided a list of locations to download blobs. The download is simple HTTP. Resuming is supported to recover from interruptions without deletion. When complete, the MD5 is checked to ensure the data has not been corrupted or tampered with.
Peer to Peer (p2p)
In addition to using the CDN, the player periodically requests devices on the local network to send BLOBs it requires. To communicate with other players, UDP broadcast packets are used.
Simplified p2p overview
- Peer opens a TCP server socket (ephemeral port) ready to receive BLOBs
- Peer broadcasts BLOB requests to UDP port 9097
- Neighbouring peers receive the broadcast and transfer zero or more requested BLOBs to peer
- Peer selectively accepts or rejects BLOB transfers from neighbouring peers
The p2p protocol is designed to be ad-hoc and concurrent. Transfers from local peers can interrupt transfers from the CDN to maximise local traffic and minimise Internet traffic.
Chaining is supported. For example, Peer C can download from Peer B while Peer B is downloading from Peer A while Peer A is downloading from the CDN.
There are internal limits to the maximum number of uploads and downloads per peer. The protocol contains a bias that favours faster peers and avoid overloaded peers.
Download priorities and conditions
In general, player software starts downloading new resources in a random order shortly after a sequence is updated. (See performance considerations below for why).
Recent player software supports custom download priorities and download conditions to provide more control over what order and when resources are downloaded.
Player software with support for download priorities and conditions:
- android-player-23.0.apk +
- android-exoplayer-10.0.apk +
- analytics-23.apk +
Download priorities
A download priority is a numeric value used to control the order resources are downloaded.
Downloading progresses through the priority numbers in ascending order. This means resources with a download priority of 1 will be downloaded before resources with a download priority of 2.
Default download priorities
- Resources have a default download priority of 10
- Resources required by sequence frames have priority offset by -5 (download earlier)
- Resources not required for at least a week have priority offset by +5 (download later)
- Resources not required for at least a day have priority offset by +3
- Resources not required for at least an hour have priority offset by +2
- Resources required by event actions have priority offset by +1
Custom download priorities
A downloadPriority can be added to the resource, item, or sequence data to override the default.
For example, to ensure an item is downloaded before all other items, a custom download priority can be added to the item data:
downloadPriority=1
To change the download priority for all items in an inner sequence, a downloadPriority can be added to the sequence data.
Download conditions
A downloadCondition can be added to the resource, item or sequence data to dynamically control when a resource starts downloading. Resources will only start downloading after higher priority resources have downloaded and the download condition evaluates to true.
For example, to ensure all resources in an inner sequence only downloaded between midnight and 4am, the following download condition could be added to the inner sequence data:
downloadCondition=time.between("00:00", "04:00")
If a download condition or priority is specified in sequence data, it will be overridden by a condition or priority in item data. Likewise, a condition or priority in resource data will override a condition or priority in item or sequence data.
Performance considerations
When updating many screens simultaneously, it is desirable to encourage items to download in a random order to avoid creating hot-spots. A hot-spot is where a single device or server is overwhelmed with requests for a specific resource.
To evenly spread load, increase reliability and performance, use a small number of unique priorities. Resources with the same download priority will be downloaded in a random order automatically.
Download order testing
To preview the order, a screen will download resources. The following web address can be used:
/debug/download-queue/[SCREEN-ID]
Remote Data Source
Players can periodically connect to a web server and fetch a JSON object. The data in the JSON object will be used when evaluating conditions.
| Name | Example | Description |
|---|---|---|
remoteDataSource | http://api.example.com/json | Endpoint to get JSON object from. |
remoteDataFetchPeriod | 10000 | The period in milliseconds between downloads. |
For example, a web server on a train could be configured to return the next station and arrival time:
{
    "nextStation": "London Bridge",
    "eta": 4
}
A condition (in a stack item or event trigger) could use this data to display an item, another sequence or trigger a custom action:
nextStation == "London Bridge" && eta < 5
Blobstores and blob sharing
All images, videos, and other resources are named based on their raw data. The Blob naming convention provides efficient storage, avoids data duplication, provides the ability to verify data and safely share the data between local devices with strong consistency.
A Blob name is the MD5 of the binary data followed by a dash then the length in bytes.
For example: 962B5B1AF8C3B868D87979E92D8BFCE7-164197
A Blob can be cached forever because a Blob with a given name never changes.
Dynamic content uses snapshots. A snapshot is the dynamically generated Blob at a specific point in time. Snapshots are updated after they are used in a lazy fashion.
Blobstores can be shared with multiple servers and served using a content delivery network (CDN).
For example: http://d3psb5pjgez07s.cloudfront.net/962B5B1AF8C3B868D87979E92D8BFCE7-164197
Additional Custom Blobstores
To supplement the global blobstores, additional blobstores can be specified in a cloud config. This makes it possible for a digital signage network to use their own infrastructure for storing and distributing images and videos.
When configured, all new data uploaded will be transferred to one or more additional servers. Players will download using HTTP from the configured endpoints.
The cloud config must use a fully qualified domain name and players must be configured with a matching serverAddress for the custom blobstore to be used.
Uploading to custom S3 bucket
blobstoreConfig | s3,[AMAZON-ACCESS-KEY],[AMAZON-SECRET-KEY],[BUCKET-NAME],[BUCKET-REGION] |
blobstoreHttpEndpoint | http://s3.amazonaws.com/[BUCKET-NAME]/ |
blobstoreHttpsEndpoint | https://s3.amazonaws.com/[BUCKET-NAME]/ |
Uploading to custom Google Cloud Storage bucket
blobstoreConfig | gcs,[GOOGLE-SERVICE-ACCOUNT-JSON-KEY-FILE-PATH],[BUCKET-NAME] |
blobstoreHttpEndpoint | http://storage.googleapis.com/[BUCKET-NAME]/ |
blobstoreHttpsEndpoint | https://storage.googleapis.com/[BUCKET-NAME]/ |
Note, JSON Key file must be added to our servers manually.
Uploading to custom blobstore
blobstoreConfig | blobstore://[SERVER-DOMAIN-NAME] |
blobstoreHttpEndpoint | http://www.mycustomserver.com/ |
blobstoreHttpsEndpoint | https://www.mycustomserver.com/ |
Uploading to custom server using FTP
blobstoreConfig | ftp://[USERNAME]:[PASSWORD]@[SERVER-DOMAIN-NAME]/blobstore/ |
blobstoreHttpEndpoint | http://www.mycustomserver.com/blobstore/ |
blobstoreHttpsEndpoint | https://www.mycustomserver.com/blobstore/ |
Uploading to custom server using SCP
blobstoreConfig | scp://[USERNAME]:[PASSWORD]@[SERVER-DOMAIN-NAME]/blobstore/ |
blobstoreHttpEndpoint | http://www.mycustomserver.com/blobstore/ |
blobstoreHttpsEndpoint | https://www.mycustomserver.com/blobstore/ |
After adding a new blobstore configuration, test it by uploading content.
Multiple blobstores can be specified by using numbered name suffixes. For example blobstoreConfig_0=..., blobstoreConfig_1=..., blobstoreConfig_3=.... The blobstores must share the same HTTP endpoints (Round Robin DNS).
A newly configured blobstore can be primed using the /blobstore-sync tool. This tool requires a user ID. All blobs accessible to the user will be transferred.
Note: Please contact us before attempting to add a custom blobstore.
Local Web Server
A web server is built in to the standard android player software. This web server can be accessed using a web browser on your local network.
The local web server provides several useful functions:
- Live logs — View local log entries as they occur in your web browser.
- Player state — Query local screen data via JSON API. Access GPS, Analytics and other data.
- Trigger — Trigger a configured API event action.
- Blobstore — View items stored on the local device.
- Reboot — Instructs a rooted device to reboot.
The internal web server is not started by default. To enable the internal web server, add the following into screen data.
localWebServerPort=9090
This starts the web server listening on port 9090. The following addresses will then become available:
http://[local-ip-address]:9090/logStreams live log output.http://[local-ip-address]:9090/player-state
Displays current player state (screen data).http://[local-ip-address]:9090/blobstore/
Display contents of local blobstore with links to downloaded media.http://[local-ip-address]:9090/trigger?name=example
Triggers a configured event action.http://[local-ip-address]:9090/reboot
Reboots the device. (Rooted device and android-player-27.0.apk or later required).
The local-ip-address can be found in the localAddress field within screen data.
The internal web server is only available in android-player-21.0.apk and later.
Please note, GLPlayer includes a complete web based administration system that automatically runs on port 9097 and the localWebServerPort setting is ignored.
Cloud Service
The digital signage service is distributed across servers in America, Europe, and Asia using different cloud providers. Traffic is routed to the closest available server using latency based routing with health checks. Asynchronous replication with eventual consistency provides low latency connections, scalability, and resilience worldwide. Multimedia is stored and delivered from Amazon S3 and Google Cloud Storage. Additional storage and CDNs can be configured.
A staging environment for testing new releases is also available. The staging environment uses the MongoDB instance in Europe.
Note: Please contact your digital signage administrator before connecting more than 500 screens.
Device Communications
Automatic Network Setup
No inbound ports need to be opened in your firewall.
For security, inbound connections can be blocked.
Ensure that devices can make outbound connections to the Internet. Devices will connect to one of our active servers and use multiple CDNs for media data transfer. We cannot provide a white list because all IPs are subject to change because we use a variety of cloud infrastructure.
Ports used for server communications (WAN)
| Type | Destination Port | Notes |
|---|---|---|
| Loader Communications | HTTP (TCP 80) | (required) |
| UDP 9091 | For instant updates. (optional, recommended) | |
| Player Communications | HTTP (TCP 80) | (required) |
| HTTPS (TCP 443) | For extra security. (optional) |
Please be aware that Android devices also require NTP (UDP 123) to set their system clock.
Ports used for local communications (LAN)
| Type | Destination Port | Notes |
|---|---|---|
| Peer to Peer Blob Sharing (data requests) | Broadcast UDP 9097 | (optional, recommended, v11+) |
| Peer to Peer Blob Sharing (data transfer) | TCP ephemeral port | (optional) |
| Playback Synchronisation | Broadcast UDP 9096 | (optional) |
| Local data and triggers | Broadcast UDP 9098 | (optional, v18.5+) |
Daily Bandwidth Estimate
The following estimates are based on loader comms every 30 seconds and player comms every 1 minute with infrequent updates over a full 24 hour period. Transfer of multimedia must be added to estimations. Blob data is only transferred once and cached locally.
| Type | Direction | Calculation | Total |
|---|---|---|---|
| Loader Communications | Device to Server | 100 bytes x 2 x 60 x 24 | 281 KB |
| Loader Communications | Server to Device | 100 bytes x 2 x 60 x 24 | 281 KB |
| Player Communications | Device to Server | 2 KB x 60 x 24 | 2880 KB |
| Player Communications | Server to Device | 10 KB x 24 | 720 KB |
| Total | < 5MB (per device per day) |
Local network blob sharing is used when devices display the same content. This eliminates duplicate Internet downloads.
GLPlayer uses a built in caching proxy server on port 9097.
Playback synchronisation modes
Multiple screens can be synchronised to start playing items at the same time. The screens must be on the same LAN and configured to display the same sequence or root base sequence. When sequences share the same root base sequence, ensure items stacked above have the same duration to prevent premature sequence progression.
Synchronisation will only occur when all data has been downloaded. It may also take up to 5 minutes to accurately synchronise the local clock after the player starts.
Accuracy varies depending on the hardware, Android version, and the type of images and videos displayed. To obtain good playback synchronisation it is recommended the same hardware is used. The following modes can be set to further optimise accuracy of synchronisation in the standard player:
| Name | Value | Description |
|---|---|---|
syncVideoMode | 0 | Prepare then start the next video immediately after the previous item. This results in a variable duration gap between videos. |
syncVideoMode | 1 | Prepare the next video and schedule it to start 350ms after the previous item. This mode adds 350ms to the duration of each item but increases accuracy and prevents the end of videos being skipped. |
syncVideoMode | 2 | Prepare the next video, schedule it to start 250ms after the previous item then pause and resume the video for up to 100ms so target start time is achieved. This trick improves start time accuracy. |
syncVideoMode | 3 | Prepare the next video 350ms before the end of the previous video and start it when the previous item finishes. (Requires decoding of two videos at the same time which is not supported on some devices) |
syncVideoMode | 4 | Prepare the next video 350ms before the end of the previous video, start it 100ms before the previous item finishes then pause and resume the video for up to 100ms so target start time is achieved. |
The default mode is 2. Modes 3 and 4 will remove the 350ms padding between items but may cause instability because for a short period, the device will be processing 2 videos simultaneously.
Note: All devices must use the same sync mode. Please add this setting to sequence and inner sequence data.
When using a variety of devices and Android versions, some may start earlier than others. To compensate the following values can be added to the screen data:
| Name | Value | Description |
|---|---|---|
syncOffset | 0 | Delay the transition between items (images and videos) by this number of milliseconds. |
syncVideoOffset | 0 | Delay starting videos by this number of milliseconds. |
Advanced Interaction
The following data can be used to control interactive presentations:
| Name | Default | Description |
|---|---|---|
enableSwipe | true | Enable swiping to navigate sequences. |
enableTouchEvents | true | Enable touch events to trigger actions. |
showTouchAnimations | true | Animate movement of items when swiped or touched. |
showSequenceButtons | false | Display left and right navigation buttons. |
showSequenceBranchBackButton | true | After navigating to another web page, item, or sequence, show an up arrow to return. |
Admin Interface Functionality
The administration interface can be configured for specific users and cloud configurations. The following data can be used to show, hide, and disable functionality available to a user or cloud.
| Name | Default | Description |
showServerConfigs | true | Display the cloud config tab and list accessible cloud configs. |
createServerConfig | true | Allow creation of new cloud configurations. |
showGroups | true | Display the groups tab and list accessible groups. |
createGroup | true | Allow creation of new groups. |
showUsers | true | Display the users tab and list accessible users. |
createUser | true | Allow creation of new users. |
showUserSettingsItem | true | Display the user settings item. |
showLibrary | true | Display the library tab and list accessible library items. |
createLibraryItem | true | Allow creation of new library items. |
showHome | true | Display the home tab. |
showSequences | true | Display the sequences tab and list accessible sequences. |
createSequence | true | Allow creation of new sequences. |
showScreens | true | Display the screens tab and list accessible screens. |
createScreen | true | Allow creation of new screens. |
showReports | true | Show the reports tab. |
showSoftwareLinks | true | Show the links to download the installation software. |
showUserManualLink | true | Show the link to this manual page. |
showAccessControls | true | Display the access tab and allow user to grant access to other users and groups. |
showData | true | Show the data tab and allow the user to add and modify raw data in objects. |
createCompositeItem | true | Allow the creation of items that display multiple images and videos at the same time. |
addCompositeWidgetItem | false | Allow a widget to be selected and added to a composite item. |
addCompositeSequenceItem | true | Allow an inner sequence to be selected and added to a composite item. |
pageSize | 20 | The number of rows displayed in a table on a single page. |
reportPageSize | 100 | The number of items to display on each page of a report. |
maxResults | 5000 | The maximum results to fetch from the server in a single request. |
showAdvancedCondition | true | Display the advanced condition for stack items. |
editStackSettings | true | Allow the user to edit stack settings such as maximum duration and stacking above. |
showFullJson | false | Display the link to view the full raw JSON of a sequence. |
displayItemShowBuildButton | true | Display button for building content using a content builder. |
displayItemShowInternetButton | true | Display button for importing from an Internet source or displaying a web page. |
displayItemShowLibraryButton | true | Display button for selecting an item from the library. |
displayItemShowUploadButton | true | Display button for uploading new items. |
showDownloadButton | true | Show download button to export data. (Note: does not apply to reports) |
showMultipleSelectButton | true | Show the multiple selection button to perform actions on multiple items. |
showSearchButton | true | Show the search button used filter items by search text, groups and columns. |
editUserLabel | true | Allow the user to edit their name. |
editUserLocation | true | Allow the user to edit their location. |
showUserAdvanced | true | Show the advanced tab in the edit user dialog. |
editSequenceLabel | true | Allow sequence label to be changed. Can also be set in sequence data (user data overrides it). |
showRssPreviewOption | true | Show option to preview the sequence or screen as an evaluated Media RSS feed. |
showSequenceTestDataOption | true | Show option to add test data to a sequence. Used for testing advanced conditions. |
showExpireOptions | true | Show options to expire, reactivate and remove expired items from a sequence. |
showFindSequenceOption | true | Show find sequence option to stack items linking to an inner sequence. |
showCopyOption | true | Show copy option. |
showRemoveOption | true | Show remove option. |
showEditOption | true | Show edit option. |
showAddItemOption | true | Show add item option. |
showSignageNodeErrorReport | false | Show the option to view the summary of SignageNode errors. |
showScreenStatusHistoryReport | true | Show the option to view the historical screen status report. |
showSimulator | true | Show the option to simulate playback for testing. |
showSequenceMappingReport | true | Show the option to view the screen mapping report. |
showUserSummaryReport | true | Show the option to view the user and group summary report. |
showUserActionReport | true | Show the option to view the user action report. |
showDisplaySummaryReport | true | Show the option to view the display summary report. |
showDisplayReport | true | Show the option to view the display report. |
showMediaUploadReport | true | Show the option to view the media upload report. |
showCollectedDataReport | true | Show the option to view the collected data report. |
showAnalyticsReport | true | Show the option to view the analytics report. |
defaultReportSearchType | screen | Sets the default report search type for display report, display summary and collected data. Valid values screen sequence libraryitem screenId sequenceId itemId libraryItemId. |
extendedOfflineThreshold | 604800000 | The delay (in milliseconds) a screen can be offline before it is hidden from the screens tab. |
showHomeServiceStatus | true | Show the service status (server, replication and reporting health) on the home tab. |
showBillingStatus | false | Show the billing status – billing group applied and how many screen not in a billing group. |
showConnectOption | true | Show the connect button. Used to create a tunnel to a SignageNode player. |
showScreenAlertButton | true | Show the alert button on the screens tab to allow quickly applying an override sequence to multiple screens in an emergency. |
Note: Additional visibility options can be added on request.
Custom App Launch
An Android app can be launched after an event trigger by providing the package name in the launch app action.
Custom intents can be launched by providing the data required for the Android Intent. Supported data includes:
| Name | Example | Description |
|---|---|---|
action | android.intent.action.VIEW | The Android action to perform. |
data | http://www.example.com/ | Data to provide for the action. (optional) |
category | android.intent.category.LAUNCHER | The category of the event. (optional) |
package | com.android.chrome | The package name for the Intent handling class. (optional) |
type | text/plain | Content type of the data. (optional) |
Extra intent data is application specific. Data names must not contain dots. Extra intent data is automatically added prefixed with android.intent.extra.. For example, TEXT will add android.intent.extra.TEXT to the extras of the intent.
Example for launching Chrome to display web page
Custom
action | android.intent.action.VIEW |
data | http://www.example.com/ |
package | com.android.chrome |
Example for printing using QuickPrinter
Custom
action | pe.diegoveloper.printing |
type | text/plain |
Extras
TEXT | <BIG>Text Title<BR>Testing <BIG>BIG<BR><BIG><BOLD>string <SMALL> text<BR><LEFT>Left aligned<BR><CENTER>Center aligned<BR><UNDERLINE>underline text<BR><QR>12345678<BR><CENTER>QR: 12345678<BR>Line<BR><LINE><BR>Double Line<BR><DLINE><BR><CUT> |
Resuming digital signage
The resume delay will be used to automatically restart DS Loader and the configured digital signage player software after a period of time.
For more flexibility, the custom app could manually launch DS Loader. This can be be achieved by adding the Android intent to the custom app: Please ask the SignCloud support team for this information.
Large Network Performance
This article highlights performance concerns for large networks. It provides a low-level description of how access controls work in relation to groups and explains the benefits of using low visibility access controls.
Access Controls
A user can have access to thousands of objects (library items, sequences, screens, users, groups, and clouds). The objects a user can view and update in the admin interface are controlled by access controls.
An access control is a link between an actor (user or group) and an object.
For example, if a user has created a library item, an access control links the user to the library item.
To find all the directly linked objects, access controls are selected where the actor is the user.
Groups add another layer of complexity.
Groups
In many ways groups are similar to users. Like a user, a group has access to objects. We may more commonly say it contains objects, is assigned objects or objects are members of the group. However, as far as the system is concerned, a group has access to objects.
For example, if a user has assigned a library item to a group, an access control links the group to the library item.
The powerful thing about groups is that a user can have access to them. If a user has access to a group, they also have access to all the objects the group has access to.
This relationship can be hierarchical. So, a user may have access to a group that has access to another child group that has access to objects.
This can become complicated quickly and this can be demonstrated by understanding how the system obtains a list of objects to display in the admin interface.
Example Scenario
A user clicks the Library tab.
What the server must do:
- Find all the objects (including groups) the user has direct access to.
- #1 For each unseen group:
- Find all the objects (including groups) the group has direct access to.
- Goto #1
This recursive access control evaluation gets demanding if there are many groups and deep hierarchies.
The system has some optimisations to improve performance, but in general, the time taken to find the list of library items is proportional to the number of access controls.
If there are 10,000 library items and each library item is in 10 groups, 100,000 access controls will need to be processed to discover what should be displayed.
Performance
To improve performance processing each group can be skipped if the group is linked by a low visibility access control. This avoids recursive evaluation #1.
Types of access control
An access control is a security technique used to regulate who can view and modify items on the digital signage platform. For example, an access control can grant a user the ability to view and modify a specific sequence. Additional access controls can be created to allow multiple users access to different items within the digital signage system.
When a user signs into the administration system, only items they have been granted access to will be visible.
Add an item to a group so users with access to the group have access to the item. You can add any item created in the digital signage system to a group.
Items can be made accessible to a user by adding the user to the Access tab when editing.
Access controls for users:
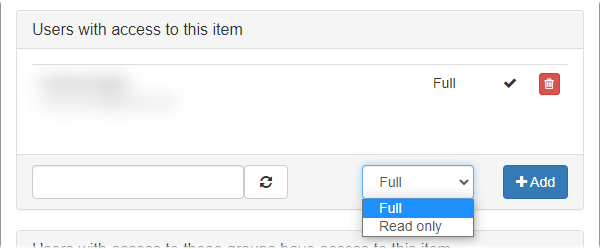
- Full — The user will have full access to the item.
- Read only — The user can only view the item.
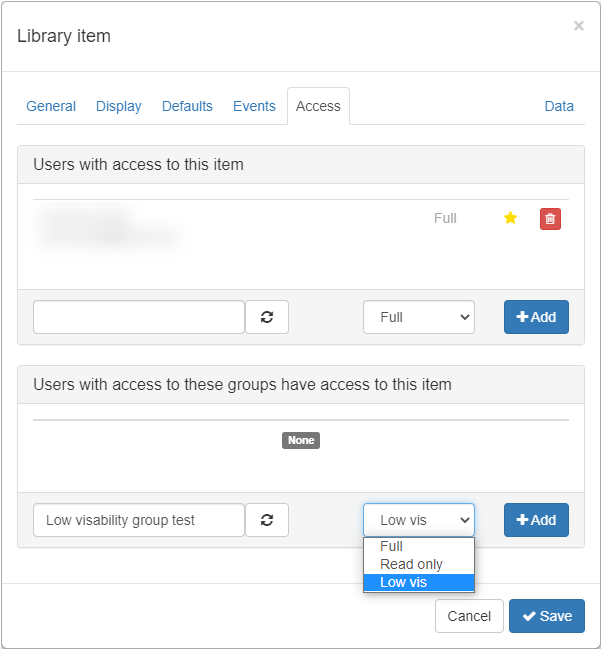
Items can be added to a group by adding the group to the Access tab when editing.
Access controls for groups:
- Full — Users with access to the selected group have full access to the item.
- Read only — Users with access to the selected group can view the item but not control it.
- Low vis — Users with access to the selected group will not see the item displayed in the full list of items. This can help speed up performance when there are a lot of items. For more information see Low visibility access controls.
Access controls can be assigned to screens, sequences, library items, users, groups, and cloud configurations.
To control access to an item:
- Click an item’s Options button (
 ).
). - Select Edit from the pop-up menu. (Or select Settings if you’re adding access controls to a sequence).
- Click the Access tab.
Note: This is only available to users with the Show access controls feature enabled. - To give access to an invidual user, in the Users with access to this item section:
- Enter a valid email address.
- Select the access level: Full or Read only.
- Click Add.
- To give access to a group, in the Users with access to these groups have access to this item section:
- Enter a valid group name.
- Select the access level: Full, Read only, or Low vis.
- Click Add.
Low visibility access controls
Use the Low visibility access controls to hide items from the full list of items. This can help speed up performance when there are a lot of items.
Any item (library items, sequences, screens, users, groups, and cloud configurations) can be associated with a group using a low visibility access control.
When an item is only accessible via a low visibility access control, the item will not be displayed in the full list of items.
To see the item, the specific group must be selected using the search tool.
Note: the item will still be displayed in the full list of items if the active user has direct access to it or it is contained in additional groups the active user has access to with full visibility.
Multiple section tool
The multiple selection tool can be used to lower the visibility of multiple items quickly.
- Select the items.
- Click the Multiple selection button (
 ) to display the Multiple selection dialog.
 - Select Revoke all permissions.
- Select Add to group and choose which group you want to contain the items from the dropdown list.
- Select Low vis.
- Click Apply.
Performance
Low visibility items can significantly speed up performance when there are thousands of items.
Further performance improvements can be gained by creating a hierarchy of low visibility groups. Create a master group that will be used to reference multiple low visibility groups. Edit each low visibility group and ensure only the master group is listed with a low visibility access control.
Using this technique, the system can skip processing access controls for large groups of items that do not need to be shown unless the group is selected.
Large deployments
There are three fundamental concepts used to manage large numbers of users, sequences, and digital signage screens:
- Access controls — Control who has access to items.
- Groups — Control multiple items at the same time.
- Sequence stacking — Control contributions to a sequence.
Access Controls
Access control is a security technique used to regulate who can view and modify items on the digital signage platform. For example, access control can grant a user the ability to view and modify a specific sequence. Additional access controls can be created to allow multiple users access to different items within the digital signage system.
Access controls for users:
- Full — The user has full access to the item.
- Read only — The user can only view the item.
Access controls for groups:
- Full — Users with access to the selected group have full access to the item.
- Read only — Users with access to the selected group can view the item but not control it.
- Low vis — Users with access to the selected group will not see the item displayed in the full list of items. This can help speed up performance when there are a lot of items. For more information see Low visibility access controls.
Access controls can be assigned to screens, sequences, library items, users, groups, and cloud configurations. To assign access controls:
- Click an item’s Options button (
 ).
). - Select Edit from the pop-up menu (or Settings for a sequence).
- Click the Access tab. This is only available to users with the Show access controls feature enabled.
- To give access to an invidual user, in the Users with access to this item section:
- Enter a valid email address.
- Select the access level: Full or Read only.
- Click Add.
- To give access to a group, in the Users with access to these groups have access to this item section:
- Enter a valid group name.
- Select the access level: Full, Read only, or Low vis.
- Click Add.
When a user signs in to the administration system, only items they have been granted access to will be visible.
Groups
A group is a collection of items. Items include screens, sequences, library items, users, groups, and cloud configurations. A user with access to a group will see all the items contained in the group in the administration interface. Multiple users can be granted access to a group.
If a user is contained in a group, all new items the user creates will be added to the group automatically. Another user with access to the group can then act as administrator for the user and access all the items they have created.
A group can contain another group of items. This facilitates a logical hierarchy of groups within groups.
A user granted access to an outer group will see all items inside that group and all items inside the inner groups. However, a user granted access only to the inner group will see items only inside that inner group.
This makes multiple layers of management possible. The outermost layer maintains complete control of the platform while the innermost layer has restricted control to only update their own sequences and digital signage screens.
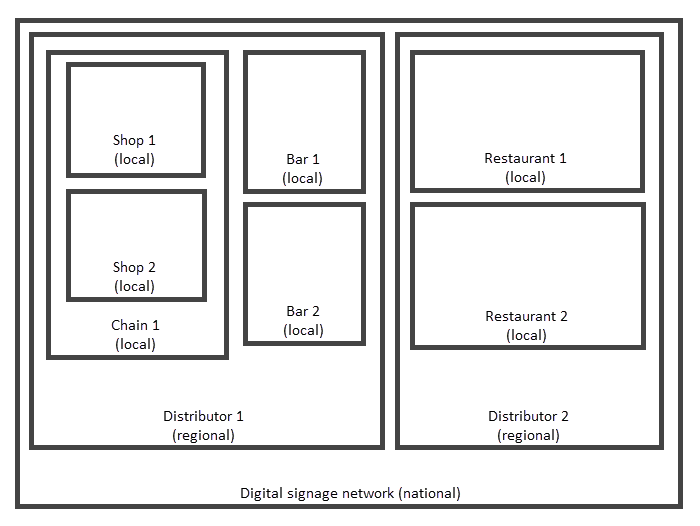
Local
Each local network of screens and users in a location should have its own group. One or more local users should be granted access to this group to act as local administrators.
Regional
Each regional distributor should have their own group. This group should contain all the smaller local networks they manage. One or more regional users should be granted access to this group to act as regional administrators.
National
All regional distributor groups should be added to a national group. One or more users acting as super administrators for the national network should be granted access to this group.
A group must have a unique name. Using hierarchical naming conventions will make management much easier. For example:
- myshop.mydistributer.mynetwork (local)
- mydistributer.mynetwork (regional)
- mynetwork (national)
There is no limit to the number of items in a group. However, the user interface will only show the first 1000 items by default. To find an item not in the first 1000 results it is necessary to select a group or perform a search. The visible list size can be increased to 10,000 without compromising performance, but searching is recommended when these numbers are reached.
Sequence stacking
A sequence is represented as a horizontal row of slots. Each slot can contain multiple items stacked in a column; this is called a stack. The top item with a valid condition will be selected for display.
Sequence stacking enables you to place another sequence on top of an existing sequence. Each of the numbered slots in the sequences are combined so that the stacks become taller. The base sequence controls whether stacking is allowed above specific slots, enabling you to ensure that certain items from the base sequence are always displayed.
Control of each stacked sequence can be given to different users by configuring the access controls. Two or more sequences can be stacked, so hierarchical management of sequences can therefore be achieved.
The base sequence has full control of all sequences stacked above as they can selectively enable and disable any of the slots. Each sequence stacked above can contribute to the sequence by adding items to the slots when stacking is enabled.
Stacked sequences effectively refine a sequence to make it more specific and localised. The base sequence contains worldwide, common items shown on all screens. The middle sequence then adds regional content. Finally, the top sequence adds local content.
Base sequence
The base sequence can be managed by a super administrator responsible for the entire digital signage network. This sequence can define the set of items that will display on all screens. By disabling stacking above, the super administrator can ensure items are displayed on all screens because it prevents sequences stacked above from using the slot.
There is no limit to the number of base sequences in a chain.
Middle sequence
Stacked above the bottom sequence is the regional distributors sequence. The regional distributor can define the set of items that will display on all screens they manage. They can also prevent stacking above to ensure their items are displayed. They can not control the slots in the bottom sequence when stacking has been disabled.
Top sequence
Stacked above the distributor sequence is the local network sequence. Administrators of the local network sequence can define the set of items that will display on all the screens they manage. They can not control the slots where stacking has been disabled by the middle or bottom sequence.
Inner sequences
In some cases it is necessary to delegate control of one or more individual slots to a disconnected user. To achieve this, a slot can refer to an inner sequence managed by the user. This technique can be useful for granting an advertiser ability to change a subset of the items outside the stacked sequence hierarchy. It also makes it possible to incorporate items from special sequences such as Media RSS feeds or sequences populated by email.
Creating users, groups and sequences
Creating a Regional Distributor
A super administrator who is responsible for the entire digital signage network must create regional distributors. To create a regional distributor:
- Create a new group for the regional distributor.
- Create one or more new users.
On the Access tab for the new user(s), make sure to add the new regional distributor group under the Users with access to these groups… section. - Assign the new user(s) to the regional distributor group so they can act as regional administrators.
- Create a new sequence using one of the master sequences as a base.
On the Access tab for the new sequence, make sure to add the regional distributor group under the Users with access to these groups… section.
Setting up a Local Network
A regional distributor who is responsible for a region must create local networks.
- Create a new group for the local network.
- Create a new user.
- On the Advanced tab, set the Base sequence to be one of the distributor’s sequences.
- On the Access tab, add the new local network group you created in step 1.
- On the Auto setup tab, add the list of mac addresses of the screens being shipped and select Create sequence and link to screens.
- Create additional users if required, remembering to add the local network group.
- Edit the local network group and grant one or more users access so they can act as local administrators.
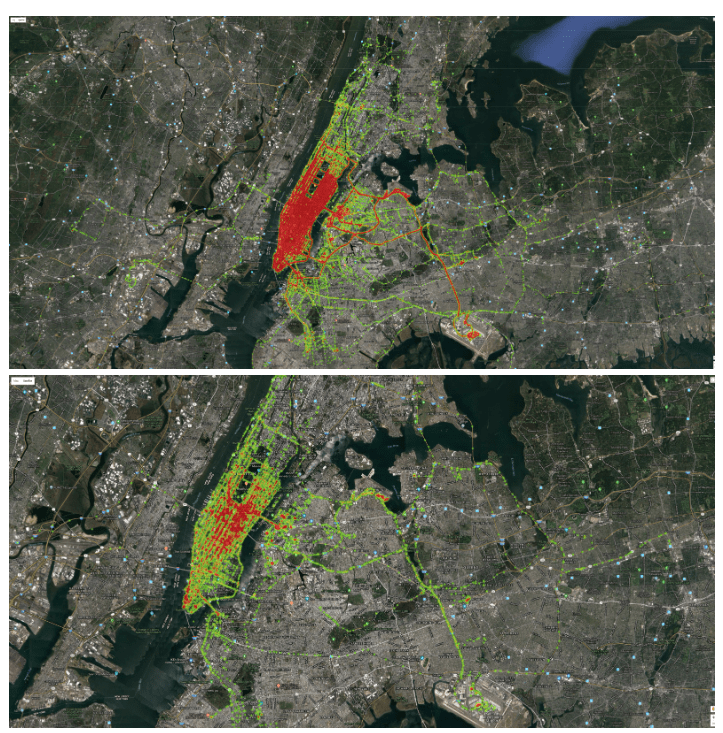
GPS tracking for vehicles
For moving screens, such as those in taxis and buses, there is a special option that can be enabled to continuously update the GPS location of a screen.
This is very useful for geofencing where items are selectively displayed or skipped based on location.
To enable the advanced GPS data collection, add the following into the screen data:
collectGps=true
You must also ensure the DS Loader app has permission to access the location.
- Open Android Settings.
- Navigate to Apps.
- Locate DS Loader.
- Locate the permissions section.
- Enable the Location permission.
The GPS location will automatically update on the device and be used in location conditions. The server will also receive this data in the display reports and screen data. Be aware that the server receives this data in batches approximately every 2 minutes.
*Please note, additional charges apply for enabling this option.
Heatmap reporting for GPS data
RS232 Communications
RS232 Communications makes it possible to send and receive data between the player and an external device. Examples of external devices include: HDMI switches, TVs, and alarms. Most USB to RS232 adapters using Prolific or FTDI chipsets are supported.
Examples:
- When a specific item is displayed or condition is true, an HDMI switch can change the input to display alternative video source.
- A TV could be turned on or off or the volume updated.
- A special item can be displayed when an alarm goes off.
RS232 Configuration
Special configuration data is required to setup the communications. The configuration must be added to screen data.
| Name | Example | Description |
|---|---|---|
rs232config | 9600,8,1,none | Set the baudrate to 9600, data bits to 8, stop bits to 1 and parity to none. |
RS232 Output
To send a command to the serial device, add the command to the data of an item.
| Name | Example | Description |
|---|---|---|
rs232output | avi=1 | When the item displays, this will send avi=1 to the serial device. |
By default, ASCII data will be sent to the serial device. To send binary data to the serial device, encode to hex and add rs232outputFormat=hex to the data.
| Name | Example | Description |
|---|---|---|
rs232outputFormat | hex | The output is provided as HEX and should be converted to binary before sending. |
rs232output | AA11FF010112 | When the item displays, this will send AA11FF010112 to the serial device. |
The rs232output data will only be sent to the device when the value changes. This prevents continuously sending the same data.
To send data when the player starts. The data can be added to a variable named rs232outputAtStart in screen data.
RS232 output communications requires loader version 12.5, player version 11.2 or above and a compatible USB to RS232 adapter.
RS232 Input
The player monitors data sent from external serial devices. After a CR or LF is received, the ASCII text string is added to a screen data variable named rs232input and can be used in condition evaluation, as an event trigger or read using the JavaScript Interface on a web page.
Only ASCII data separated by CR or LF is supported. RS232 input communications requires player version 21.3 or above.
RS232 Output for Samsung Screens
A custom configuration for monitoring and controlling Samsung TVs with RS232 input is available. Add rs232config=samsung to screen data to enable. When enabled, the following values will be added to screen data.
| Name | Example | Description |
|---|---|---|
samsungScreenPowerStatus | on | Screen power status. Values: on off. |
samsungScreenInputSource | hdmi1 | Screen input source. Values: hdmi1 hdmi2 dvi dtv display_port. |
samsungScreenVolume | 25 | Screen output volume. Values: 0-100 |
Screen status will be checked every 10 seconds. Additional options can be added to rs232config to automatically maintain the status.
| Name | Example | Description |
|---|---|---|
rs232config | samsung,off | Keep the samsung screen turned off. |
rs232config | samsung,on,hdmi1 | Keep the samsung screen turned on and set to HDMI 1 input. |
rs232config | samsung,vol=22 | Keep the samsung screen at a volume of 22. |
Screen status can also be updated by sequence items. This can be useful, for example, to switch to another input based on conditions or events. Add rs232output to item data.
| Name | Example | Description |
|---|---|---|
rs232output | hdmi2 | Switch to HDMI 2 input now. |
rs232output | dtv,vol=50 | Switch to digital TV input and set volume to 50 now. |
RS232 Output for Samsung Screens requires loader version 12.5 and player version 14.1 or above.